Science projects for class 10th include Electromagnets, Pulse Counter, and Plant Growth Regulator among others. These projects offer a chance to explore interests, delve deeper into a topic learned in class, and showcase creativity and critical thinking skills.

Table of Contents
A CBSE Science project entails many phases, including formulating and "owning" the question, organising and compiling data, conducting literature research, formulating a Car hypothesis, experimenting, and designing. While science projects are meant for internal assessment, they also induce creativity, critical thinking, problem-solving, and many other hidden skills of students.
Some of the top Science projects for class 10th are Wireless Electricity Transfer, Solar Car Project, AC Generator, Van De Graaff Generator, Pulse Counter, etc. The CBSE Board mandates that board school students come up with science projects for Class 10th, and these projects serve as an internal assessment for the students and are, therefore, central to scoring well.
Top Science Projects for Class 10th Students
The four forms of CBSE Class 10th science projects include theoretical projects, experimental projects, exhibition projects, and engineering projects.
Any student struggling to find science projects for class 10th can check out the experiment list provided below. This list of the top Science projects for class 10th will help the students to effortlessly build up any project:
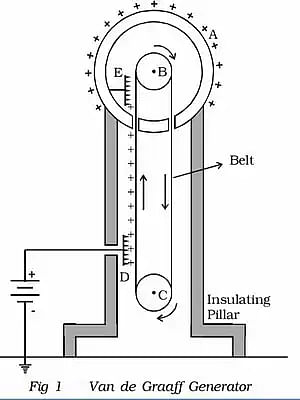
1. Van De Graaff Generator
The Van De Graaff Generator is one of the easiest ideas for science projects for class 10th. Another name for the Van De Graff generator is a particle accelerator.
This generator ionises the air around by producing high voltage differences.
- Van De Graaff Generator: Materials Required
- Making of Van De Graaff Generator
- Working of Van De Graaff Generator
Van De Graaff Generator: Material Required
Below are the requirements for the Van De Graaff generator:
- PVC Pipe 0.5″ X 2 ft
- 4 PVC Elbow
- PVC pipe as lower roller 0.5″X4″
- PVC pipe as upper roller, 2″x4″ fixed roller
- 2 tee (PVC)
- Teflon tape
- AC/DC motor (100 rpm)
- Metal sphere
- Wire brush
Making of Van De Graaff Generator
The procedure for the Van De Graaff generator science project for class 10 is as follows:
- Step 1: At the base, make a brush of thin copper wires from a thick electric wire.
- Step 2: Set the brush beneath the roller and belt to eliminate negative charges.
- Step 3: Connect the other terminal of this wire with a steel rod.
Note: This is done because negative charges have been produced at the lower end and positive charges at the upper end, so these negative charges have been drained out using the metal rod, or they can also be used for testing.
- Step 4: Connect the lower roller to the shaft of the motor directly.
- Step 5: Make a 2-inch-wide belt out of the electric tape.
- Step 6: Fix the 2-inch upper roller at the top. The reason for fixing this one is that when the belt moves around, it will cause friction between the belt and roller, resulting in the static charge being produced on it.
- Step 7: Likewise, bottom one, make another wire brush by taking out copper wires from an electric wire. Set it above the belt to draw charges through the wire to be accumulated on the steel pot.
Working of Van De Graaff Generator
To prepare the Van De Graaff generator, one of the easiest science projects for class 10th students, it must be remembered that the belt starts moving when the motor is turned on. It is due to the high friction on the top roller if it does not start moving, so give it a slight push.
Once it starts moving, it will rotate continuously. Ensure that there is no dirt on the roller, as the generator might get stuck on the roller.
As soon as the generator starts, take a neon bulb and bring it closer. Students can observe a red glow. The intensity of light will vary depending on the distance of the bulb. By this method, students can also find the point where the field intensity is the strongest. Students will notice that the charge has accumulated at the top.
Also Read: CBSE Class 10 Science Viva Q&A
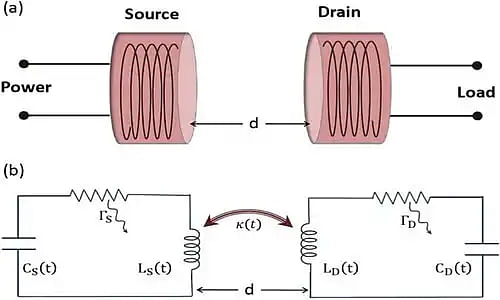
2. Wireless Electricity Transfer
The Wireless Electricity Transfer model is one of the most fun science projects for class 10th. Apart from being fun to make, the wireless electricity transfer model is equally powerful. If made correctly, this model is even capable of charging a phone.
Wireless Electricity Transfer: Material Required
Below are the requirements for the wireless electricity transfer model project.
- 26 to 30 gauge copper wire
- ttc5200 transistor
- Two resistors of 3.3 or 6.6 kohms
- LED
- Tungsten filament bulb
- Scissors
- Pliers/wire cutters
- Battery/ power adapters (12V)
- 4 diodes
- Cylinder/role with 8 cm diameter
Making of Wireless Electricity Transfer
Under the science projects for class 10th, the construction of this model is done in two parts: The Receiver coil and the Transmitter coil. The procedure for making the Receiver coil and Transmitter coil is as follows:
- Take a coil and turn it 25 times. Now connect LEDs to the ends of the coil.
- Take a cylinder with an 8 cm diameter and whirl the wire on it 55 times after leaving 3 inches.
- Make a loop for the centre terminal and whirl it again 55 times.
- Students will get three terminals of the coil. Now take the TTC5200 transistor and connect its base to the 6.6 k ohm resistor.
- The other terminal of the resistor will be connected to one end of the coil and the collector at the other end of the coil.
- Now connect the emitter to the negative terminal of the 12 V power supply.
- The transmitter will be ready after connecting the centre terminal of the coil with the positive terminal of the battery.
- To make the LED glow, place the receiver coil almost 15 cm above the transmitter.
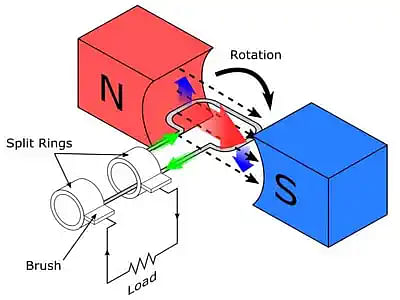
3. AC Generator
An AC generator is used to convert mechanical energy into electrical energy with the use of magnetic induction. This is by far one of the most intriguing physics projects for class 10th students.
AC Generator: Material Required
Below are the requirements for the AC generator project.
- Superglue (Elfi) 20 mm
- 1/5′" PVC pipe
- 4 Magnets
- 6" wooden piece
- 6″ long iron nail
- LED's
- Copper wire 30 to 34 gauge
- Paper tape
- Iron strips 2
- Soldering iron
- Pliers
- Roller
- Drill machine
- Iron saw
- Screwdriver
Making of an AC Generator
The construction of this model requires the making of a coil and a rotor. Procedures for making Coil and Rotor for an AC Generator are as follows.
- Step 1: Making of Coil
The following steps must be followed for the making of a coil:
- Measure 2 ½ inches of the iron strip and cut it into ten equal parts.
- Pile all parts together using paper tape such that there is no space between strips.
- Now, wrap 300 turns of copper wire approximately around the bundle of strips vertically. To secure it, wrap the paper tape around it.
- A student needs two such coils to make an AC generator.
- Step 2: Making of Rotor
The following steps must be followed for the making of a rotor:
- Take a half-inch diameter PVC and cut a piece of 2 ½ inches.
- With the help of super glue, stick four bar magnets on the piece of pipe.
- Make sure that the same pole of magnets is in an alternating manner.
- Make sure that the poles of the magnets are aligned correctly by using another magnet.
- Step 3: Axle making
The following steps must be followed for axle making:
- Make an axle using 6" long iron nails.
- Mark the length of the magnetic rotor after leaving half an inch from the tail of the nail.
- Wrap the paper tape on the nail in a way that the magnetic rotor gets fixed on it.
- Step 4: Body of the Generator
To make the body of the generator, follow the following points:
- Take 6×6″ wooden pieces and two pieces of PVC pipes (one of 2″ and the other of 1″).
- Make a vertical groove on the 1-inch PVC pipe.
- Align it with a 2-inch piece and make a hole in it.
- Check if the axle is perfectly levelled after fixing the axle through both PVC pipes.
- With the help of super glue, stick the PVC pipes on the wooden base.
- Make two more coils as previously discussed, leaving both of their terminals outside the tape.
- Cut two half-inch pieces of PVC pipe.
- Join the pieces perpendicular to the axle (one on each side) at the base.
- Fix the coil on each of the PVC pipes.
- With the help of a lighter, burn the coating of coils at the terminals.
- Step 5: Testing
The following points must be followed for testing:
- To make the LED glow, join the LED with the coil and rotate the nail.
- If both coils are connected in series, then the LED will glow brighter.
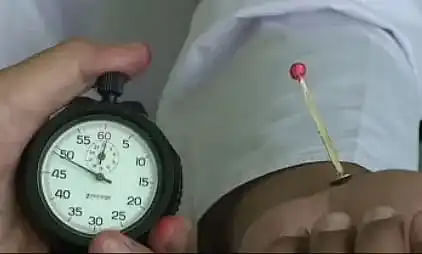
4. Pulse Counter
Pulse rate, or the heart rate, is the number of times the heart beats per minute. As the blood is pushed through the arteries, the arteries undergo expansion and contraction with blood flow.
The pulse rate can be felt on the palm side of the wrist or the neck.
Pulse Counter: Materials Required
Below are the requirements for the pulse counter project:
- Packing material
- Matchstick
- Thumb pin
- Permanent marker
- Cutter Scissors
- Scotch tape
- Stopwatch
Making of Pulse Counter
The procedure for making a pulse counter is as follows:
- Step 1: Wrap the scotch tape around the bottom end of the match stick
- Step 2: Insert a thumb pin into the bottom end of the match stick
- Step 3: Remove the chemical from the match stick head and sharpen it using a cutter.
- Step 4: Colour a small ball of packing material using a permanent marker
- Step 5: Now insert the ball on the top end of the match stick.
Pulse Counter Testing
The procedure to test the pulse counter is as follows.
- Find the point on the wrist where students can feel a strong pulse.
- Place the pulse counter on the point identified and observe its movement.
- Count the movement and time it with the help of a stopwatch
- The normal pulse rate is 60-100 beats per minute
Also Read: CBSE Class 10 Deleted Science Syllabus
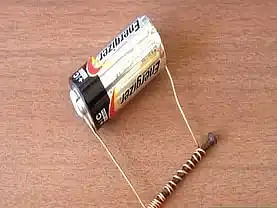
5. Electromagnets
Electromagnets are a type of magnet where an electric field produces a magnetic field. They consist of wire wound into a coil. Their magnetic property of attraction can be turned on or off as desired by switching off the flow of the electric current supply. Thus, unlike permanent magnets, the strength of the electromagnets can be altered by changing the amount of electric current that flows through them.
Electromagnets: Materials Required
Below are the requirements for the electromagnets project.
- 6V lantern battery
- Enamel-coated magnet wire, 30 AWG (75 feet)
- Alligator clip leads-2
- Iron bolts, 2.5 inches long and 0.5 inches in diameter
- 220 grit sandpaper
- Steel paper clips (more than 50)
- Scissors/wire cutters
- A paper towel holder or a pencil box
Making of Electromagnets
Making an electromagnet by wrapping a coil of wire around an iron core and determining the change in the electromagnet's strength with the number of coils wound.
Given below are step-by-step instructions to construct an electromagnet.
- Step 1: Tightly wind the magnet wire around the iron bolts, making four different electromagnets with 50, 100, 150, and 200 turns of wire, respectively.
- Step 2: Use a paper towel holder or a pencil to hold the magnet wire spool while winding the magnets.
- Step 3: Leave a tail of wire, minimum 6 cm long, at each end of the coil. Connect the coil to the battery using these wire tails.
- Step 4: Use small pieces of masking tape to attach each end of the coil to the bolt to prevent it from unwinding.
- Step 5: Unwind the magnet wire from the spool by rotating the iron bolt. Use the fingers to keep the wire tight against the bolt, and wrap each successive turn tightly against the previous one.
- Step 6: The 50- and 100-turn coils should fit completely on the smooth part of the bolt. The 150 and 200-turn coils would go onto the threaded part.
- Step 7: Keep track of how many turns you make.
- Step 8: Use masking tape and a marker to label each magnet with the total number of turns.
- Step 9: Use the 220-grit sandpaper for sanding off 1 cm of the enamel insulation from both ends of each coil.
Electromagnets Testing
The procedure to test the electromagnets is as follows:
- Step 1: Make a data table like this:
|
Number of Turns |
Number of Paper Clips Picked Up |
|||||
|
1 |
2 |
3 |
4 |
5 |
Average |
|
|
50 |
|
|
|
|
|
|
|
100 |
|
|
|
|
|
|
|
150 |
|
|
|
|
|
|
|
200 |
|
|
|
|
|
|
- Step 2: Put the paper clips in a small, shallow container.
- Step 3: Starting with the 50-turn coil, use the electromagnets to pick up paper clips from the shallow container.
- Step 4: The electromagnets would get hot if left connected to the battery in between tests.
Note: Always disconnect one alligator clip when the electromagnets are not in use.
- Step 5: Connect one end of the red alligator clip to the positive terminal of the battery and the other end to one end of the wire coil. Make sure to connect to the part where the insulation was sanded off.
- Step 6: Connect one end of the black alligator clip to the negative terminal of the battery, and the other end to the free end of the wire coil quickly to avoid heating of the electromagnet after it is turned on.
- Step 7: Touch the bolt’s head to the pile of paper clips, and then pull the coil away from the tray.
- Step 8: Some paper clips must be attached to the bolt. If it does not lift any paper clips at all, then the electromagnet is not working.
Note: Move the bolt away from the tray, and then disconnect the alligator clip. This should turn the electromagnet off, and the attached paper clips should fall away from the bolt.
- Step 9: Count the number of paper clips that were attracted to the magnet, and note the value in the data table.
- Step 10: Repeat step 3 four more times, for a total of five trials.
- Step 11: Repeat steps 3–4 for the 100, 150, and 200-turn coils, and then disconnect the electromagnets from the battery.
- Step 12: Calculate the average number of paper clips picked up for each number of turns in the coil.
- Step 13: Make a graph of the results. Plot the number of paper clips picked up on the y-axis versus the number of turns in the coil on the x-axis.
Also Read: CBSE Class 10 Physics Syllabus
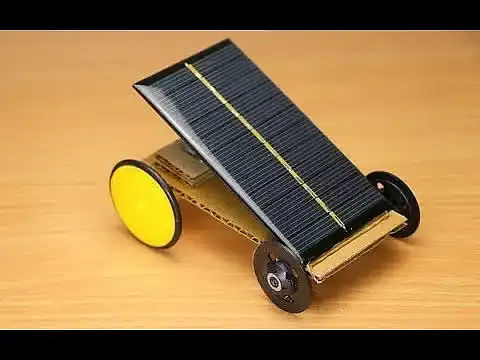
6. Solar Car Project
The solar car project is an experiment to build a car that moves using solar energy. The students who are highly interested in physics and mechanics can take up this project. It is one of the most fun and easy science projects for 10th-grade students.
Solar Car Project: Materials Required
The listed materials are required to make a solar car from scratch. The students can find these materials in any electronics shop.
- Solar cell
- DC motor
- Motor mount
- Four wheels
- Dowel for axles
- Straw
- Traction bands
- Eyelets or washers
- Wood sheet
- Basswood
- Procedure sheet
- Glue
- Soldering iron
- Craft knife
Making of Solar Car
The students are requested to follow the steps of making a solar car carefully to get the desired results:
- Step 1: Cut a 2-inch-wide strip of wood.
- Step 2: Mark axles by drawing two lines and mark two points around 6 mm away from each side.
- Step 3: Each screw will hold the axles, so insert one eye screw in each of the points.
- Step 4: Insert the axle and ensure the alignment is straight and can spin freely. Later, use a piece of straw and place it as a spacer on both sides.
- Step 5: After making space for the wheels, insert the wheels on all four sides.
Note: If the rear wheels are plain, students need to insert a gear or a pulley next to the rear wheel.
- Step 6: Insert a small pulley or a gear onto the shaft of the DC motor. Place the motor on the mount and strap it well.
- Step 7: Place it on the motor mount on the car, and make sure the gears on the wheel and another on the shaft are engaged.
- Step 8: Place the solar panel on the car and connect all the required wires to the motor. Note that the solar cell panel is placed slantingly.
- Step 9: Test the solar car in a sunny location to see if it works.
Also Read: CBSE Class 10 Home Science Syllabus
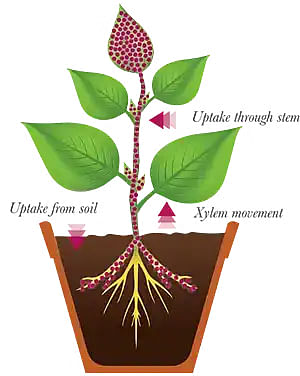
7. Plant Growth Regulator (PGR)
PGR is a chemical-related experiment where the students will work around the phytohormones, also known as plant hormones. Plant Growth Regulators are divided into two major groups:
- Plant growth promoters, e.g., auxins, gibberellins and cytokinins
- Plant growth inhibitors, e.g., abscisic acid.
Plant Growth Regulator: Materials Required
- Any ten sampling seeds
- Ten mud pots
- A window with essential sunlight
Making of Plant Growth Regulator
The students are required to follow these simple steps to make the Plant Growth Regulator work:
- Step 1: Plant ten seeds in each pot, and each pot comprises all factors such as water, sunlight, and nutrients, but in different proportions.
- Step 2: Label each pot so that it is convenient for identification.
- Step 3: Place 5 pots where there is a high amount of sunlight near the window.
- Step 4: Take the rest of the 5 pots and place them with a low amount of light to the nearest window.
- Step 5: The pots with a high amount of light should be watered at 9 AM.
- Step 6: The pots with a low amount of light should be watered at 2 PM.
- Step 7: Note down the plant's height, colour, the number of leaves present at each stalk, the day they sprouted and how healthy it looks.
- Step 8: After one month, judge each plant based on the categories in which the plant is assessed.
Note: The higher points of each attribute of plant growth will help the students to conclude that the watering timings and the sunlight timings are essential for the plants to grow accordingly.
8. DNA Model
DNA (deoxyribonucleic acid) is in the family of molecules referred to as nucleic acids. One strand of DNA has a backbone consisting of a polymer of the simple sugar deoxyribose bonded to something called a phosphate unit. Very unimpressively, then, the backbone of a strand of DNA resembles this:
sugar-phosphate-sugar-phosphate-sugar-phosphate-sugar-phosphate
In our model, we use a white ball to represent sugar and a red ball to represent phosphate. What is impressive about DNA is that each sugar molecule in the strand also binds to one of four different nucleotide bases.
These bases: Adenine (A), Guanine (G), Cytosine (C) and Thymine (T), are the beginnings of what we will soon see is a molecular alphabet. Each sugar molecule in the DNA strand will bind to one nucleotide base. In our model, we use light blue balls for Cytosine, light green balls for Guanine, yellow balls for Adenine and Orange balls for Thymine.
The purpose of this project is to make a model of the Double Helix DNA molecule. This model may be used for demonstration or teaching about DNA.
Material Required:
- Styrofoam balls (about 100)
- Double-end toothpicks (75)
- Wooden or metal laboratory stand
- Brushes for painting the balls
- Additional material such as paint or watercolour, glue, and string.
How to make the model?
- Step 1: Paint all the balls with water-based or latex colour. The following are the colours that we used in our model.
-
- Yellow is for Adenine (A)
- Green is for Guanine (G)
- Blue is for Cytosine (C)
- Orange is for Thymine (T)
- White is for Sugar
- Red is for Phosphate
- Step 2: Use toothpicks to make pairs of Adenine Thymine with sugars on the ends. Also, make pairs of Cytosine Guanine with sugars on the ends. These pairs form the steps of the ladder in a DNA molecule.
The number of different color balls in our model is as follows:
| Molecule | Colour of Ball | Quantity |
| Sugar | White | 32 |
| Phosphate | Red | 30 |
| Adenine | Yellow | 8 |
| Thymine | Orange | 8 |
| Cytosine | Blue | 8 |
| Guanine | Green | 8 |
- Step 3: Connect the wood dowels together using wood glue to make a longer wood dowel. It may take a few hours for the glue to dry. Insert the long wood dowel into the base.
- Step 4: Place the first pair on the base and use a wire or string to tie it to the wood dowel.
- Step 5: Insert toothpicks in red balls (phosphates) so that the ball will be centred on the toothpick. Insert one red ball over each white ball (sugar) and adjust the angles so your DNA model will become a double helix.
- Step 6: Mount the second pair over the previous one. Toothpicks from phosphates will enter the sugars of the new pair. Continue with another set of phosphates and new pairs on top of each other. After a few rows, use another wire or string to tie the last pair to the column (wood dowel).
- Step 7: Continue that until your DNA model is ready.
Fun and Creative Science Projects for Class 10th Students
top Science projects for class 10th are the perfect way to explore STEM (Science, Technology, Engineering, and Math). It appeals to the creative side of the students, which enhances their conceptual understanding explicitly.
However, it is not just about creativity; it is also about reasoning with the ways and means of the invisible forces present around us, which are still foreign to human minds, and how discoveries can be made. This will help the students to grasp the idea of research and development.
Here are some miscellaneous science projects for 10th-grade students that can be helpful for them during their assessment:
- The chemistry of clean: make the soap to study soap synthesis
- Electrolyte challenge: orange juice vs. sports drink
- Design a cell phone stand
- Recreate the water cycle in a bag
- Magnetic railway signal project
- Conduct an egg drop
- Inside the burning engine system
- Crystallise the rock candy
- Learn about plant transpiration
- Turn milk into plastic
- Pull an egg into a bottle
- Test pH using cabbage
- Construct a homemade LAVA lamp
- Use rubber bands to sound out acoustics


![Motilal Nehru National Institute of Technology, [MNNIT] Allahabad](https://media.getmyuni.com/azure/college-image/small/motilal-nehru-national-institute-of-technology-mnnit-allahabad.webp)


POST YOUR COMMENT